Getting Started with Docker
Updated on March 18, 2020
Introduction
Throughout my college career in computer science, I have found the need to develop applications that will be deployed in a Linux environment. When I previously used Windows 10 as my daily driver, I have usually turned to a couple of different options: virtual machines, Windows Subsystem for Linux, or Cygwin. Recently, I discovered an alternative method for building and testing Linux apps that is especially useful for collaboration and deployment. Docker allows you to package an OS and all the necessary dependencies into a docker image. You can then spin up an instance of this image called a docker container in which you can run your source code. Jake Wright's video was incredibly helpful in my understanding of what docker is, how it's different from virtual machines, and how to use it.
Installing Docker
Depending on your host machine's operating system, you will install one of the following Docker products. If you have macOS or Windows, your first option should be Docker Desktop. Check if you meet the system requirements. If you do not, Docker Toolbox is the legacy option that uses Oracle VirtualBox rather than Hyper-V or HyperKit for virtualization. For a computer with Windows 10 Home, you would use Docker Toolbox for Windows. This blog post will discuss some solutions to edge-case issues with Docker Toolbox that Docker Desktop users will hopefully not have to deal with.
- macOS
- Windows
- Linux
Docker Toolbox & WSL
As mentioned previously, I am using Docker Toolbox since Windows 10 Home does not support Hyper-V for virtualization with Docker Desktop. You can run docker toolbox in a command prompt or powershell terminal, but I personally prefer to use WSL because I am more familiar with bash terminal commands. If you are interested in this setup, continue reading this section. Otherwise, you can skip ahead.
Installing WSL
The default way to install WSL is through the Microsoft Store. This will install WSL on your system drive (e.g. C:\). If you are like me and don't want to install it on your system drive, follow the instructions here.
Setting Up Docker Toolbox with WSL
After installing WSL, follow the instructions in
Setting Up Docker Toolbox for Windows Home 10 and WSL to Work
Perfectly!
starting with
Install Docker and Docker Compose within WSL. As you will
have seen near the end of that post, there are some extra steps
needed to ensure that volume mounts work. After setting
root = /, you will need to configure shared folders for
the default docker machine in VirtualBox.
Shared Folder Configuration for Volume Mounting
I configured all of my drives as shared folders so I can mount any
folders on my host machine to any docker containers I run. In your
WSL terminal, run
docker-machine.exe start to start the
default docker machine created by the Docker Quickstart
Terminal. After your docker machine is running, open the shared
folder settings as shown in
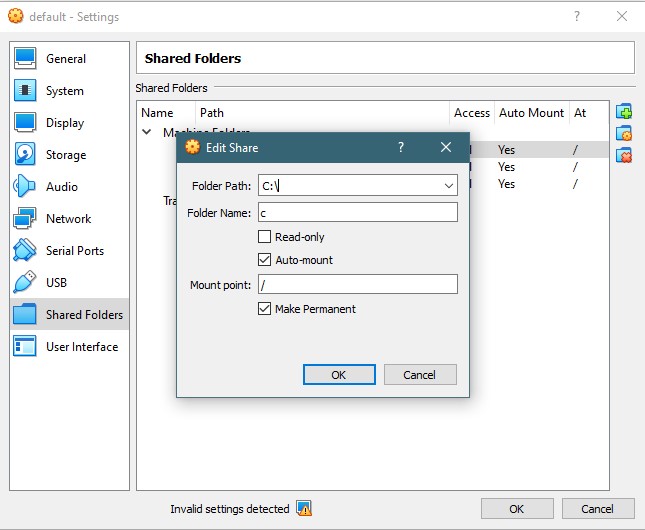
Fixing Volumes in Docker Toolbox. The image below shows how C:\ on my host computer is
mounted at / in folder c on my docker
machine such that C:\ maps to /c. Make
sure you have enabled Auto-mount and
Make Permanent. Click OK to save all settings,
then go back to the WSL terminal and run
docker-machine.exe restart default. Now your docker
machine should be properly configured to allow volume mounting.
Increase Docker Machine Resources
One issue I ran into with the default settings for the
default docker machine is the amount of RAM allocated
to it. I attempted to build the
GTSAM
library inside a docker container and ran into an
internal compiler error: Killed (program cc1plus). As
mentioned
here, the solution is to increase the RAM allocated to the docker
machine in VirtualBox. In the WSL terminal, run
docker-machine.exe stop to shutdown the docker machine.
When this is complete, right click on the
default docker machine in VirtualBox and open
Settings. In the System tab, increase
Base Memory. Similar to virtual machines, I would not
recommend allocating more than half of your system's RAM. For
example, my computer has 16 GB of RAM, so I would only recommend
allocating up to 8 GB of RAM to the docker machine. You can look
through the other options, such as number of allocated processor
cores, as well if you wish.
Building Images & Running Containers
To learn about Dockerfiles and a basic example, check out the video in the introduction. To learn about Docker Compose, check out Jake Wright's video on the topic.
X Forwarding for GUI Applications
In a virtual machine, you can easily run GUI applications such as a web browser, text editor, etc. In a docker container, the process is a little bit different. You will need to download an X Server such as VcXsrv Windows X Server.
Run GUI app in linux docker container on windows host
provides a great explanation of why you would want to do this and
how to run your docker container. The post discusses how to set your
IP address as the
DISPLAY environment variable that is passed to docker
via the -e DISPLAY=$DISPLAY command line argument. You
can alternatively pass your IP address as an environment variable in
your docker compose file. This is shown in
MAAV's ROS Tutorial
(reproduced below). The main settings to look at below are
environment and network_mode. Set the
DISPLAY environment variable to
[ip_address]:0.0 and set
network_mode: "host".
# docker-compose.yml
version: "2"

services:
ros-demo:
    image: ros-demo
    privileged: true
    volumes:
    # Mount the current directory do everything in /tutorial within docker
    - .:/tutorial:rw
    environment:
    - DISPLAY=1.1.1.1:0.0 # Change 1.1.1.1 to your IP Address
    network_mode: "host"
    container_name: ros-demo
    command: "/bin/bash --init-file scripts/source-ros.sh" #source ros automatically
Helpful Docker Commands
- System Prune to clear space on Docker Machine
docker system prune --volumes
Conclusion
Hopefully by this point, you have a better understanding of what docker is, why you might want to use it, and how to get a docker machine setup so you can build and run docker containers. If you have any questions or suggestions for improvement, feel free to contact me.